Tutorial: Creating and auto-scheduling an editorial content report
Assume that you are a manager for a digital marketing agency, managing content for a client who wants to measure the effectiveness of a content marketing strategy over the course of a quarter. You want to analyze what content you have published over this time period and then use that data to inform conversations about content performance and trends, as well as to help you make data-driven decisions to improve your content strategy.
After finishing this tutorial, you will be able to create an automated editorial content report that keeps your team updated with the latest content performance insights without having to manually generate reports every time.
Context
Objective
- Measure the performance of content produced over a quarter.
- Optimize future content strategies based on the insights from the report.
Prerequisites:
Your role requires certain permissions to view and create editorial content reports.
- You must have the Area > Reports permission.
- You must have the UI > Manage Reports permission.
- Click > Reports.
- In the Name field, enter
Published Articles. - In the Description field, enter
Report to generate a list of published articles. - Under the Data Provider field, retain Data Supplier.
- Under the Data Supplier field, retain Content Query. Your form should look similar to the following image.

 Creating a new report
 - Next to Any Content Type, click .
- In the Edit Dynamic Query pop-up, create your query using the filters on the left by doing the following:
- In the Any Content Type filter, select Article.
- In the Any Status filter, select Published.


- Once you have selected all of the criteria for your query, click Done.
- Expand Display Fields and select the Body, Headline, and Publish Date fields from the drop-down to display in the report for the assets that it returns.
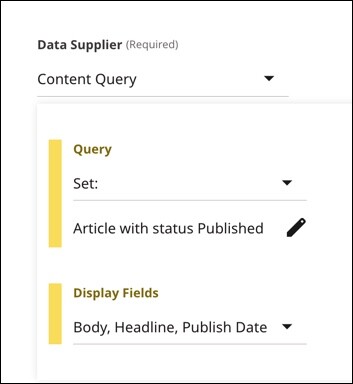 Content Query settingsNoteOptionally you can click the checkboxes above the field groups to select all display fields in that field group.
 - Click Save.


As you create or edit an editorial content report, you have the option of making it automatically run on a scheduled basis. For this tutorial, you will set it so that it recurs weekly.
To set up a recurring schedule for a report:
- Expand Auto-Run Report, and do the following:
- Select Set:.
- Expand the Day cluster and select Every X Days Of Week.
- Under Start, select Monday.
Under Frequency, select 7.
This ensures the report runs automatically every week on Monday.
- Click Save.
Now that you have set up a content edit report and set it so that it recurs weekly, you will ensure that you can conveniently check the report on your dashboard. You will do this by configuring the Content Reports widget.
To configure the Content Reports widget:
- Create or open an existing shared or one-off dashboard. For details, see Creating a shared dashboard or Creating a one-off dashboard.
- Under Main Tab Columns, expand the dashboard column.
- Under Widgets, click Add.
- Select Content Reports Widget.
- Under Preferred Download Formats, click Add.
- Select CSV from the list.

- Click Save.

Now that you have configured an editorial content report and have configured a dashboard to display the Content Reports widget, you will confirm that the widget is working as intended.
- Click > Dashboard.
- Ensure that the Main tab on the dashboard displays the Content Reports widget with a list of all reports, including the
Published Articlesreport you made during this tutorial. - Click to download a copy of the
Published Articlesreport from the run date and time shown in the widget.

In this tutorial, you've learned to create an editorial content report and schedule it to recur every seven days that helps you see what you have published, which can help inform conversations about content performance and trends, and can help you make data-driven decisions to improve your content strategy.